Before diving into how Notion can be used for project management and its positive impact, let me quickly share my personal experience with it. Back in August 2023, while casually browsing YouTube in my free time, I came across a video from a popular YouTuber talking about time management, productivity, and all the usual topics surrounding organizing time. The truth is, this video piqued my curiosity, especially since I work across various fields in my day-to-day life. I was excited to discover a tool that could truly organize my time and thoughts—something more than just a simple note-taking app for jotting down ideas and schedules.
The truth is, Notion truly amazed me and exceeded my expectations in every sense. I was able to manage my time and team perfectly, organize my thoughts, and dive deep into analyzing them in a detailed, structured way rather than in a scattered manner. I can also track my progress and review productivity statistics over periods I define. The most remarkable feature I found in Notion is that it allows me to “step inside my mind” and see everything flowing smoothly, with the ability to make decisive choices about many things that previously required a lot of mental effort.
Notion is an all-in-one tool that enables individuals and teams to manage projects, organize tasks, and collaborate in a single workspace. Thanks to its versatile features and high level of customization, Notion has become a popular choice for companies and teams aiming for higher productivity and better organization. This guide is designed to be a comprehensive resource on using Notion for efficient project management—from getting started to overseeing a full project lifecycle.
What is Notion, and why is it ideal for project management and time organization?
Notion is a tool designed for organizing and managing information, with a key strength being its ability to combine project management, note-taking, progress tracking, and even database management—all within a single interface! Thanks to these features, you and your team can benefit from using it as a unified workspace that enhances communication, organizes ideas, and accelerates goal achievement.
In August 2016, Notion 1.0 was launched as a desktop application, and by 2018, the Notion app was released for Android. In September 2019, the company announced it had reached 1,000,000 users! Time flew by, and in 2023, Notion introduced an AI-integrated version, allowing users to interact with AI and receive answers based on their personal or team data within Notion. Wikipedia
Let’s start with the basic steps to set up Notion for project management
Creating a Workspace for Your Project:
First, you can log into Notion’s web version here if you’re not using Notion on your PC. The first step is to create a dedicated workspace for your project. The workspace is where you’ll organize all content related to your project, such as tasks, notes, and reports. You can create separate workspaces for each project you’re working on.
Click on your account name in the top left corner of the screen. You’ll see the three-dot icon (…). Click on it, and then select “Create workspace.”

Setting Up Main Pages for the Project You Created:
After creating the workspace, it is advisable to set it up with a main page that provides an overview of the project. This page should ideally include key components such as core tasks, project goals, resources, and capabilities. Furthermore, this page can be customized to include links to additional subpages, which helps streamline data organization and enhances accessibility. This structure facilitates better project tracking and improves overall workflow management by ensuring that critical information is readily available and easy to navigate.
How to Create Subpages in Notion:
On the right side of the workspace we created, you will find a (➕) button on the left side of the screen. This button is used to create a subpage for the main page or workspace we just set up.

Creating Pages to Track Team Tasks or Personal Tasks:
You can create pages to track tasks, where tasks are distributed on a daily or monthly basis. Notion is very flexible in organizing this type of page. You can add many elements specifically designed to organize and track tasks, such as tables, task distribution lists, etc.
What do you think of a hands-on experience for creating a task tracking page?
Alright! First, we need to create a subworkspace as mentioned above (refer back to the top of the article if you’re unsure). Don’t forget to name the page you created with a suitable title to make it easier to access later. Then, follow the steps below:
Add a table or database to host the tasks within it.
Inside the subpage you created, we will create a table database to host the tasks you want to add, which is very simple. There are multiple ways to add an element to any page or workspace in Notion, but I’ll mention the easiest and best method for me. Simply position your cursor anywhere inside the page (in editing mode), then type the symbol “/”. A list of elements you can add to the workspace will appear. You need to choose “Table” as shown in the following image.
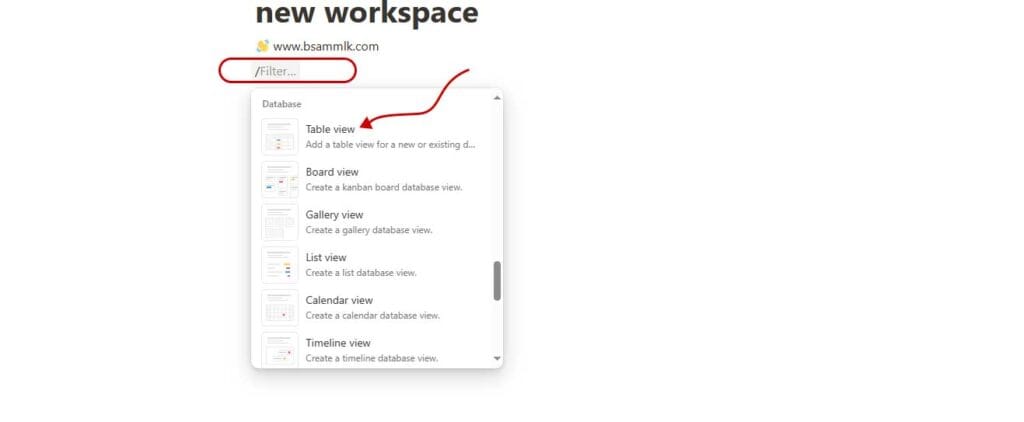
After that, a database will appear that you can customize to suit your task organization and tracking needs. Don’t worry about customization—it’s very easy and flexible. Just follow along with me and explore the features and other methods you can benefit from on your own.
The main parts of the table that we can customize are:
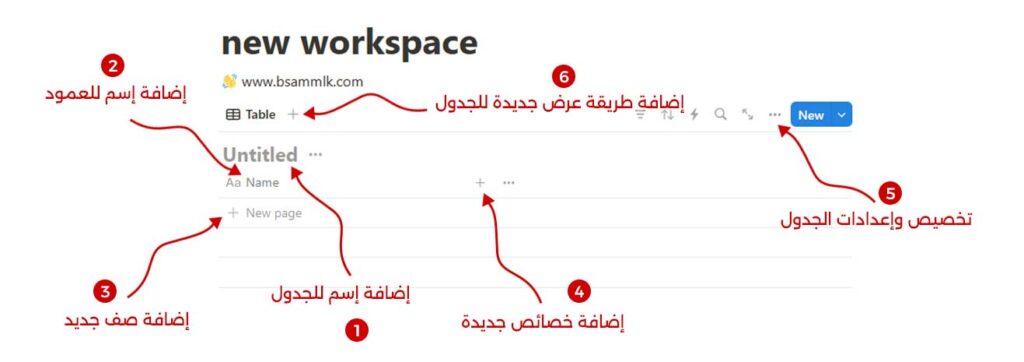
Adding a Name to the Table: Here, you can give the table we just created a suitable name based on the tasks or data you’ll rely on for organization.
Adding a Column Name: This column could be for a checkbox, task date, responsible person, etc. In any case, you can name this column here.
Adding a New Row: Like any other table you’ve worked with, there must be an option to add a new row for entering more data. You can do this using the ➕ icon.
Adding New Properties: This is the best part for me! Through the ➕ icon, you can add many properties that will strongly support the table. For example:
- Number – Numbers
- Select Box – Checkbox
- Date – Dates
- URL – Links
- Phone – Phone numbers
There are many other properties you can explore yourself. Don’t miss out on the experience—it’s one of the best ways to learn and gain knowledge!
Customizing and Table Settings: From here, you can control some table settings like showing and hiding properties, sorting, etc. I recommend exploring these.
Adding a New View: This is one of the things I find fun in Notion! You can change the way data, information, and tasks you’ve entered are displayed into more flexible views. Each view type focuses on highlighting a different type of data. The best way to understand the benefits of these views is to try them out after creating your table.

Creating a Timeline for the Project in Notion:
Notion provides the ability to create timelines that allow you to set start and end dates for each task. These timelines are used to monitor the progress of the project and ensure that the team is adhering to the work plan.
Let’s do a hands-on experience to create a timeline for a project
To create a timeline for a project, in the same subpage we recently created, we will type the symbol “/” to bring up the list of elements or components we can add, as mentioned earlier (refer back to the top of the article if you’re unsure). We will then choose “Timeline View” from this list, as shown in the following image.
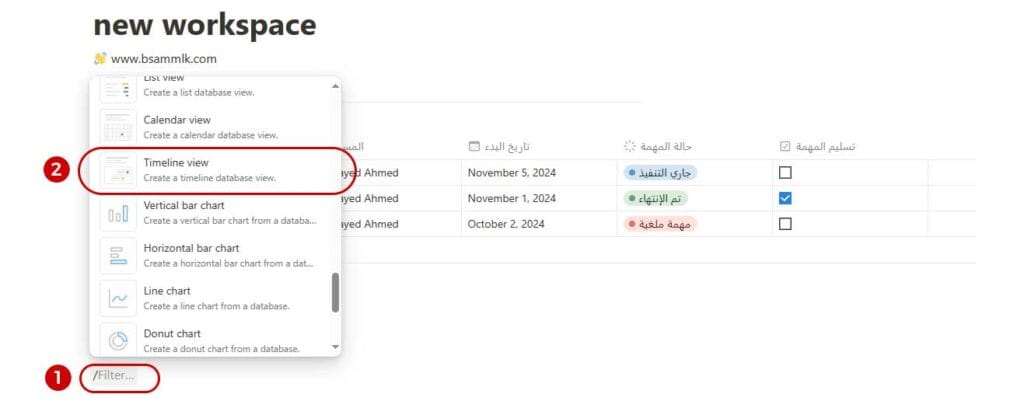
After this step, a new database will appear with a timeline and default tasks that you can delete or modify.
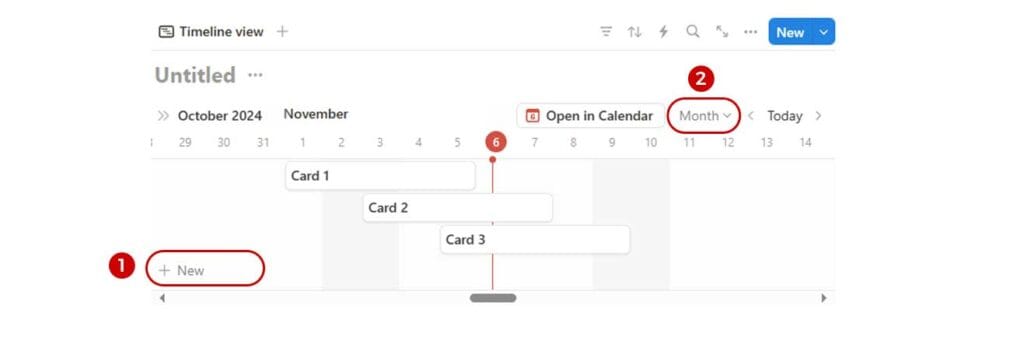
1- Click on the ➕ icon to add a new task to the timeline
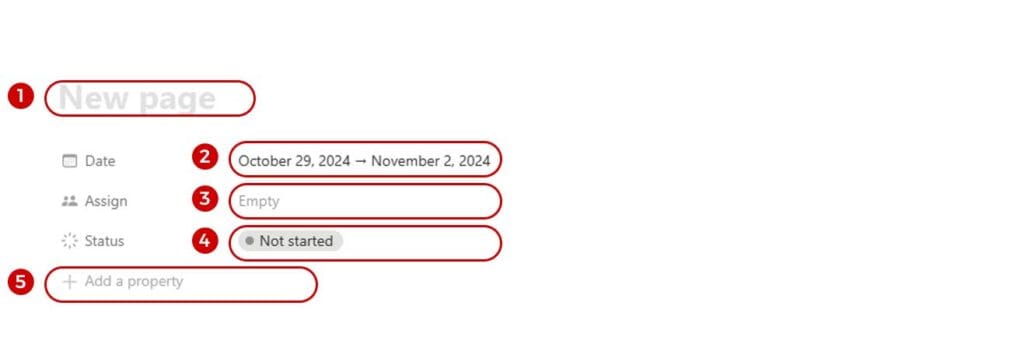
- Name the new task.
- Add the start and end dates for the task.
- Enter the person responsible for the task.
- Select the task status.
- You can add other properties to the task.
2- Here, you can change the display duration
(daily, weekly, monthly, etc.) according to your needs to view tasks that require longer or shorter durations.
You can also use filters to sort and filter tasks by a specific person, time period, priority tasks, completed tasks, etc. If you are working with a team, you can share the page with your team and track the project’s progress through comments and any updates made to the timeline.
Why do we give tables importance when learning Notion for project management?
So far, we have delved into and gone through two experiences to learn how to create databases in Notion, even though Notion is not limited to just databases. However, I wanted to focus on them because Notion is a powerful tool for creating customized databases. We can create databases for tasks, resources, or even shared notes between the team. Each of these can contain detailed information such as descriptions, dates, status, priorities, etc.
At first, you may feel that creating databases in Notion is complicated. I felt the same way at the beginning, but soon I couldn’t do without practicing it continuously for my tasks, finances, appointments, projects, future goals, even visual tracking, and more. Remember, spending some time learning how to organize your time will pay off in increased productivity later on!
Some features that you can also implement in Notion:
Notifications and Alerts
You can set up alerts on Notion to remind you of deadlines and task updates, ensuring that everyone stays informed of the latest updates.
Adding Members and Assigning Permissions
Add your team members to the new workspace and set their permissions. You can specify the permissions for each member individually, such as read-only, edit, etc.
Adding Comments and Sharing Ideas
One of my favorite features in Notion is the ability to add comments on tasks and notes. This helps members share their thoughts, ask questions about any section, element, or point. This feature encourages communication within the team and avoids any confusion about tasks.
Using Emojis to Categorize Projects and Tasks
You can add emojis to different sections to easily distinguish between pages. For example, you can add:
- 🌐 for general pages.
- 💻 for technical tasks.
- 📊 for statistics and reports.
- 💵 for budgets, etc.
It’s difficult to cover everything that can be done with Notion, but I recommend experimenting and practicing on your own to discover the vast possibilities that will make your day more productive.

Using Ready-Made Templates in Notion – Notion Template
I didn’t want to mention them at the beginning of the article so you wouldn’t get lazy about learning the basic table mechanisms, so that you have the fundamental knowledge of what you can do with this powerful tool. Here’s the good news! Notion offers many ready-made templates that help you get started quickly. In these templates, you’ll find project management templates, task report templates, project timelines, and more. You can start with these templates and modify them by adding or deleting items until you develop your own template that serves your ideas and those of your team, specially designed for you.
An advanced video demonstrating the control and customization of different Notion tables.
Notion is a powerful and comprehensive tool that will give you the ability to manage your projects and coordinate your work in one place. With its flexibility and customization power, whether you’re working on a small project or planning a complex one, Notion can be your ideal partner in achieving your goals. If your team is new to Notion, guide them to take quick courses on it, as it might be unfamiliar to some.


